
Build your own diyLight with inexpensive parts and the provided firmware.
Follow the Instructions and you will be up in no time.
Hardware requirement
You will need the following main Hardware components
- ESP8266 based Microcontroller (e.g. NodeMCU, Wemos D1 Mini etc)
- Adressable LED Lights according to your project size
- WS2812 (5V DC RGB)
- SK6812 (5V DC RGBW)
- Powersupply
- Recommended 5V DC 2A or more
- Various Hardware
- USB Cable for Flashing Firmware
- Solder Iron (optional)
- Some Cable to Connect everything
Flashing the Firmware
Starting with the easiest part:
- Plugin your ESP8266 Microcontroller
- Navigate to install.diyhue.org (Chrome or Edge Browser !!! )
- Follow the Instructions on Screen and Flash the Firmware according to your Hardware Setup
- WS2812 LED –> Generic or Gradient Strip Firmware (recommended for WS2812)
- SK6812 LED –> SK8612 Firmware
- Flash
- Done
Adding your diyLight to your Network
Just one more step before you can manage and control your new Light!
Add your new Device to your local WiFi network. The diyLight will open a Access Point (WiFi) if it can not connect to a local Wifi or it is new flashed.
- Connect your Smartphone to the WiFi Accesspoint (e.g. diyHue Gradient Strip)
- Navigate to 192.168.4.1 in your Phone browser
- Connect your diyLight to your local Wifi by providing the Local Wifi Credentials
- Upon Success:
- the Accesspoint will disapear
- diyLight connects to your local Wifi
- diyLight can be added to diyHue later
- Navigate to your new diyLight via the assigned IP from your Router
- Edit the number of physical connected LED Pixel (LED COUNT) and your desired division
- Number of Virtual Lights = Strip will be Divided into given Segments
- Assign each Virtual Light a number of Leds
- e.g. 100 physical Led connected 3 Virtual Lights with (30 + 40 + 30) Leds
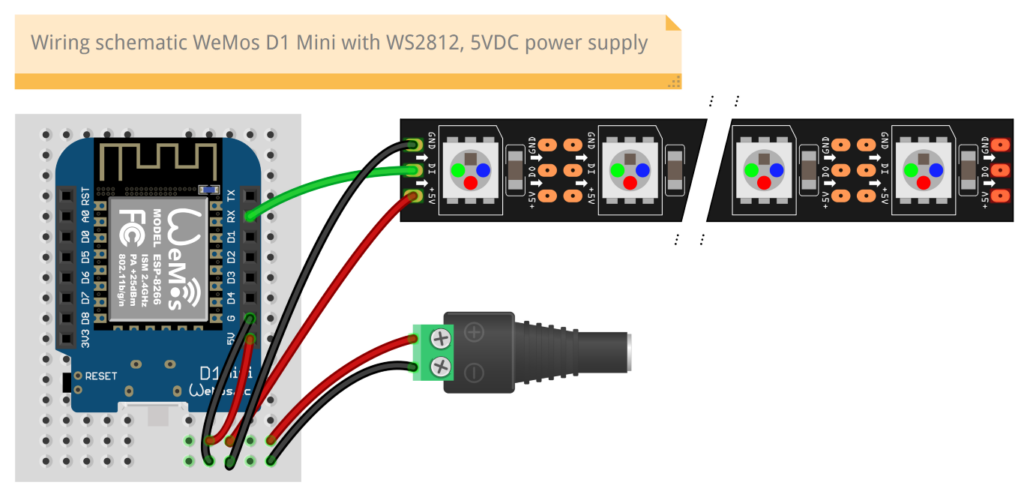
Connect Power and LED Strip
Warning!
If you use more than 20 led do not power your controller and LED Strip via the onboard usb socket! supply power via “vin” Pin to the PCB and Power direct to your leds. Otherwise you will kill a diode on the controller.
Good Practice in regard to Power Consumption:
Less than 20 LED (Power via USB Socket)
- LED + <–> 5V Pin
- LED Data <–> RX Pin
- LED GND <–> GND Pin
More than 20 LED (External Powersupply)
- LED + <–> VIN Pin <–> Powersupply 5V
- LED Data <–> RX Pin
- LED GND <–> GND Pin <–> Powersupply GND
REBOOT DEVICE
Add new diyLight to diyHue
Usually the new lights are autodetected.
However: You can start a new lightsearch within your diyHue controlling app (e.g. Hue Essentials)
Gradient Firmware vs Generic Firmware
Both Firmware work similar however the gradient strip has a dynamic size of pixels emulating a real gradient strip.
With the generic firmware you can select the size of each section indiviually.
Both Firmware are ready for the entertainment function!
diyLights are ONLY compatible with diyhue!
you can not connect a diylight to any original bridge because of different wireless communication method. Wifi != Zigbee. You need a diyhue emulator instance running!
Sumup
- Flash
- Add to local Network
- Edit Settings
- Connect Hardware ( + Powerup)
- Add to diyHue Emulator
- Enjoy
Links
diyHue getting started instructions
2 thoughts on “diyLight – build your own smart Light”
Hello, it says that i can’t connect diylight to original bridge, but is it possible to connect my WS2812 LED on ESP8266 (gradient firm.) to emulated bridge that connects to original Hue Bridge?
Hey! That is correct diyLights work only with diyHue Emulated Bridge. The Emulator “Looks” like a real bridge to all other software in turn making a real bridge obsolete. Sry for the late reply. Hope that helps